3rd Party Renderer
Arnold (HtoA)
- Submit a render.
- Check the render log in rrControl.
- Search for the line "* HtoA source path is set to".
- Create that folder
- Open the folder with your HtoA installation on your local machine.
For example the folder c:\solidangle\htoa\ htoa-3.2.0_r9e1313b_houdini-17.0.352\ htoa-3.2.0_r9e1313b_houdini-17.0.352\
Copy the contents of that folder (Do not copy the folder htoa-3.2.0_r9e1313b_houdini-17.0.352, copy the contents of the folder. (Subfolder "arnold", "configs", ...))
Paste them into the folder that RR has shown in the render log file.
Custom source folder
It is possible to override the path to Redshift via RRs rrEnv file RR\render_apps\_setenv\all\houdini__inhouse.rrEnv or via the Jobs rrEnv file.
Set the env var RR_HTOA_BASE.
For example:
RR_HTOA_BASE = \\myfileserver\Renderer\HtoA\htoa<rrJobRendererVersion>__houdini<ExeVersionFull>
Arnold license
Please see our help page Autodesk Licensing for more information.
Redshift
- Submit a render
- Check the render log in rrControl.
- Search for the line "* RedShift source path is set to ...".
- Create this folder
- Copy the contents of your local Redshift folder into that folder. (On Windows, Redshift is installed in c:\ProgramData\Redshift\, on linux /usr/redshift/ )
- Note: Redshift does not supply a new plugin for each Houdini version. But RR expects to have a plugin matching your Houdini version.
Search for (a different line) "Redshift Houdini plugin folder is set to" in the render log.
If the folder does not exist, then please duplicate the next lower version and name it according to the version that you use.
Custom source folder
It is possible to override the path to Redshift via RRs rrEnv file RR\render_apps\_setenv\all\houdini__inhouse.rrEnv or via the Jobs rrEnv file.
Set the env var RR_REDSHIFT_BASE.
For example:
RR_REDSHIFT_BASE = \\myfileserver\Renderer\Redshift\Redshift_<rrJobRendererVersion>
Exporting .rs files without a GPU:
It is possible to export .rs files on a machine that does not have any GPU installed.
Redshift does not need a GPU for writing .rs files, but the Redshift plugin requires the NVidia libraries for its startup.
You have to copy the NVidia libs from a machine with a GPU into the Redshift/bin folder.
On Windows, the libs are located here: C:\Windows\System32\nv*.dll
Note: If you use the same Redshift folder for rendering, then you should ensure that all GPU machines use the same NVidia driver version as the one you copied to /bin.
Pixars Renderman
- Submit a render.
- Check the render log in rrControl.
- Search for these two lines
|
* Renderman ProServer source path is set to ....\render_apps\renderer_exe\houdini\win_x64\RendermanProServer-.....
|
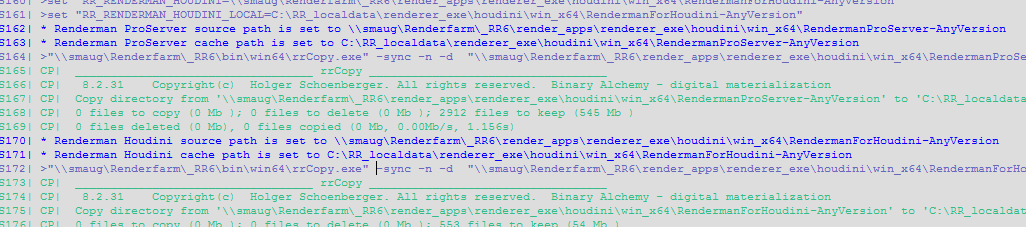
- Create these folders
- Search for the folder with your Renderman installation on your machine.
For example the folders
c:\Program Files\Pixar\RenderManForHoudini-23.4
c:\Program Files\Pixar\RenderManProServer-23.4
Copy these folders into the Royal Render folder. The folder names should match the stated folder in the render log - Pixars Renderman license
Please copy your pixar.license file (that should contains your license server name and some other information) into these two new folders.
Or you can define the path to the license file in RR\render_apps\_setenv\all\houdini__inhouse.rrEnv, see line PIXAR_LICENSE=
ROP setup/artist notes:
No output via RR?
We have seen that Renderman 23.4 does not print any error message in batch render. Example: "Camera does not exist".
But you can change your ROP to "Render current frame" and try render inside the Houdini UI.
In this case the node displays a small error icon. Just hover over the ROP with your mouse and click on the error icon that appears on the left side of the node to see the error message
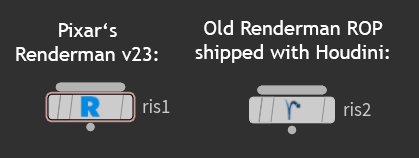
Renderman not loaded?
There have been cases in which Pixars Renderman was installed on the artists workstation, but the artist was using the Renderman ROP version that was shipped with Houdini.
This is an example with Houdini 18 and Renderman v23. As long as Houdini does not update the included Renderman version, you can see the difference in the logo of the ROP:
Custom source folder
It is possible to override the path to Redshift via RRs rrEnv file RR\render_apps\_setenv\all\houdini__inhouse.rrEnv or via the Jobs rrEnv file.
Set the env var RR_RENDERMAN_BASE.
For example:
RR_RENDERMAN_BASE = \\myfileserver\Renderer\Renderman\RenderMan
Octane
- Submit a render.
- Check the render log in rrControl.
- Search for the line "* Octane source path is set to".
- Create that folder
- Copy the contents of the Octane zip folder into this folder.
Custom source folder
It is possible to override the path to Redshift via RRs rrEnv file RR\render_apps\_setenv\all\houdini__inhouse.rrEnv or via the Jobs rrEnv file.
Set the env var RR_OCTANE_BASE.
For example:
RR_OCTANE_BASE = \\myfileserver\Renderer\Octane\<rrJobRendererVersion>__houdini<ExeVersionFull>
License
Please see Octane Standalone for a license information.
Windows: Note that Houdini uses the user preference folder in C:\RR_localdata\SysUserPrefs\All.
Known Limitations
- Output File Extensions
If the extension of your archive or output image is not recognized right,
then please use complete paths with extensions in your Octane ROP.
Examples:
Image output: $HIP/render/$HIPNAME.$OS.$OCTANE_PASS.$OCTANE_LAYER.$F4.exr
Archive export: $HIP/archive/$HIPNAME.$OS.$F4.orbx - .Orbx export
By default, Octane does not support to export one .orbx file per frame.
It supports to export a single file with all frames only.
But not via RR! :-)
Specify a frame number $F4 in your archive export name like $HIP/archive/$HIPNAME.$F4.orbx.
You must not use the button "Render to Disk" in your Octane ROP,
you have to let RR export the .orbx files via a job.
Note that Motion Blur does not work if an .orbx file contains 1 frame only.
Therefore the "createOctane" job has an job option "Motion Blur" enabled by default that exports the subsequent frame into the .orbx as well.
The .orbx files might be a bit larger if you have many objects that change.